No, not those kind. Seriously, this is a gun blog, what kind of person do you take me for?
Anyway, joking aside, today we’re going to talk about the “line” system. Maybe you’ve heard people talk about “my line 1 gear” or “well, that’s line 3 gear,” and you have no idea what they’re talking about. The line construct is a military concept, so I’ll try to break it down in a way that it applies to responsibly armed citizens (RAC). For example, every day carry isn’t a thing for most of the military, so I’m putting it where I think it belongs here.
Basically, the line system ranks equipment based on need. Different gear falls into the various lines based on the level of conflict it might be required. The big thing to remember is that the equipment at each rank is probably going to vary by person. I’ll talk about general guidelines, but you’re going to have to customize it to your specific needs.
Line 1 – Every Day Carry (EDC)

Line 1 gear is the equipment that you have on you at all times – or at least the majority of the time. For most civilians (including law enforcement), this is your every day or off-duty carry. Items that might be included in this line:
- Identification
- Important keys
- Knife
- Cell phone
- Firearm/extra magazine
- Pocket flashlight
- Pocket/ankle individual first aid kit (IFAK)
Like I said, I don’t expect you to carry all of this, all the time. Some people do. Some people also add escape and evasion (E&E) kits because they live in an area that kidnappings are likely. Take these suggestions, analyze your needs, and build your Line 1 accordingly.
Line 2 – Battle Belt
When we look at Line 2 gear, this is the gear that we might be putting on when our EDC just isn’t going to cut it. For law enforcement, this might be a duty belt and soft armor. For the RAC, things are a little different. By the time you get to Line 2, civil order has probably broken down (or is about to), and you’re starting to strap on battle rattle.

The belt will be your first piece of Line 2 gear that will go on. The idea is to equip the belt with essentials that you want to keep on you and that will allow you to fight even if you don’t have your main battle load. My belts usually have some combination of the following:
- Belt (either padded or operator style)
- Retention holster
- 2-3 pistol magazines
- 1 rifle magazine
- IFAK/tourniquet
- Dump pouch
- Communications (usually a radio at this point)
With this load, I can defend myself, care for life-threatening wounds, and reach out for help. Key point – this is not my main battle load, and I don’t build it out like one. This is bare minimum defensive gear.
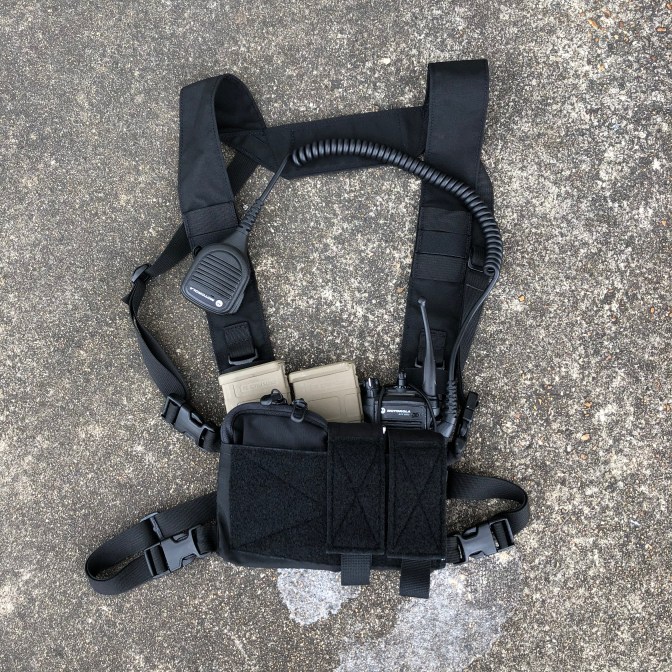
Line 2 – Armor/Chest Loads

The next piece of Line 2 gear to consider is a chest rig or plate carrier and helmet. For a law enforcement officer, this might be your active shooter kit in the trunk of your car. Many of your options may be dictated by policy. For the RAC, this is going to be dictated by your particular activities. If you are going for a longer patrol of your area or out in the country, you may throw on a chest rig with magazines. If you are manning a checkpoint, working in a very population dense area, or know a fight is coming, you may throw on a full plate carrier setup. The full plate setup may also contain more magazines than a chest rig, but that’s according to your needs. If you want to hear some more thoughts on that, I wrote a much earlier post about it.
Line 3 – Sustainment
Backpack time! Line 3 gear is the gear that is going to keep you fighting out in the field – food, water, additional ammunition, batteries, changes of clothes, sleeping/cooking gear, and so on. This is going to be highly subjective. I know plenty of guys who don’t believe in “snivel gear” like ponchos or hammocks. I know other guys who believe that having some comfort gear cuts the “suck” factor down a little and keep morale up longer. When you’re considering what to bring, think about your fighting gear and what backups you might need for that (flashlights and sights need batteries, as do radios). You’re going to need to eat and drink at some point, so if you don’t carry extra water, carry a method to gather water. Unless you’re an expert forager (and in an area you can forage), food is probably a good idea.
Once you get those basics down, anything else you carry is up to you. Just remember – you have to carry it. When that high-speed backpack is nice and full, throw it on and start walking. You’ll figure out pretty quick just how far you can make it with your initial plan. If you feel that the pack is weighing you down, unpack it and figure out what you absolutely need. Ditch the other stuff, or accept the suck.
Conclusion
These are some general guidelines when you’re thinking about setting up your gear. Just like I can’t tell you what gun you should buy for your EDC, I can’t tell you exactly what you should carry. All I can do is lay out guidelines and let you think for yourself. Self-defense and preparedness is a thinking person’s game.
I hope this has been useful for you. If you enjoyed, give us a follow and a share. Social media really limits our ability to advertise, and organic shares always have the biggest impact. If you think I missed something or have a question, drop a comment below. Alternatively, you can contact me via my Facebook page, Google Hangout, or email at guntoter.official (at) gmail.com. I also have a Patreon page now if you would like to support the site.
Thanks for reading!
2 thoughts on “Doing Lines”